
Showing posts with label ArcView gis. Show all posts
Showing posts with label ArcView gis. Show all posts
PRACTICAL WORK ARC VIEW SOFTWARE PART 3
 |
| PRACTICAL WORK ARC VIEW SOFTWARE PART 3 |
detailed ArcView
Using table data

- (79) : to save the project
- (80) : to cut, copy and paste an attribute value
- (81) : to select all
- (82) : to deselect all
- (83) : to reverse the selection
- (84) : to create a diagram
- (85) : to search for characters in attribute values
- (86) : to make a query (query builder)
- (87) : to group the data selected
- (88) : to make a table joint
- (89) : to make a synthesis statistic
- (90) : to calculate the attribute value
- (91) : to sort the attribute values in ascending or descending order

- (92): to select ONE record
- (93): to change an attribute value
- (94): to find registration information
Adding a field :

- Edit" menu >> "Add Record" to add records
- (93) to change the attribute value from 1 to 1
- (90) to change the attribute values of the selected records or all records if there is no selection on an enabled field
Update the value of an attribute on a selection

- Enter "quote" for character type attributes
- The value for a constant
- "YYYY-MM-DD". AsDate for a date
- True or False for a Boolean
- Form an expression according to the other attributes by double-clicking on the attribute and functions
Handling table data
Opening the theme attribute table- In a view, make the theme active. Click on the tool (15)
- Or Menu " Theme " >> " Table
- to open other tables
- add the table in ArcView:
- in "Project", activate "Table", click on "Add".

Creating data from coordinate files

- Add in ArcView the file containing the X and Y coordinates
- Open the coordinates file
- Open the view window
- Menu "View" >> "Add Event Theme"
Table joint
- Generally, the join is done between a table assigned to a theme and a non-geo-referenced table. But it can also occur between two non-geo-referenced tables
- The two tables have a common attribute: the same type and attribute value even if the field names are different
- Open both tables
- Enable the common attribute on the source table
- Also, enable the common attribute on the destination table
- The button (88) is activated
- Click on this button: the attributes of the source table are repatriated to the destination table
Querying data from a table
Data attribute query- Using the Query Builder: button (17) in the "View" or "Table" window

- o If the "Update Values" box is not checked, the attribute values are not displayed
- o If the number of records is very large, this checkbox is not displayed on this dialog box
Querying data from a table

- Make the theme where the request is made active
- Menu "Theme" >> "Select by Theme"
- Unroll the spatial relationship and we have:

Geoprocessing
- Load the "Geoprocessing" extension

- Then in "View" >> "Geoprocessing Wizard"
Dissolve:
Create a new theme by merging entities that have the same attribute value
Active if there is a theme on the view
Create a new theme by merging entities that have the same attribute value
Active if there is a theme on the view

- The name of the field on which the merge is based is therefore required
- Only concerns one topic
Merge
Merge two adjacent themes
- Both themes must have the same attributes: same name - the same type
- Is only active if there are at least two themes on the view

Clip
Breakdown of a theme in relation to another theme
- Is only active if there are at least two themes on the view
- The resulting theme contains only the attributes of the source theme

Intersection
- Cutting a source theme into another theme
- The resulting theme contains the attributes of both themes

- Is only active if there are at least two themes on the view
- The resulting theme contains both the geometry and attributes of the themes concerned

Assignment
- Is only active if there are at least two themes in a view
- Table join: the attributes of the table used for the assignment are repatriated to the table of the theme to be assigned
- There is no new theme resulting from this
- To break the joint: in the table document, "Table" menu >> "Remove all Joins".

Buffer zone creation
In view, make active the theme for which you want to create a buffer zone- Select the geographical elements to which the area(s) are associated
- Menu " Theme " >> " Create Buffers "

- follow the instructions on the dialog box
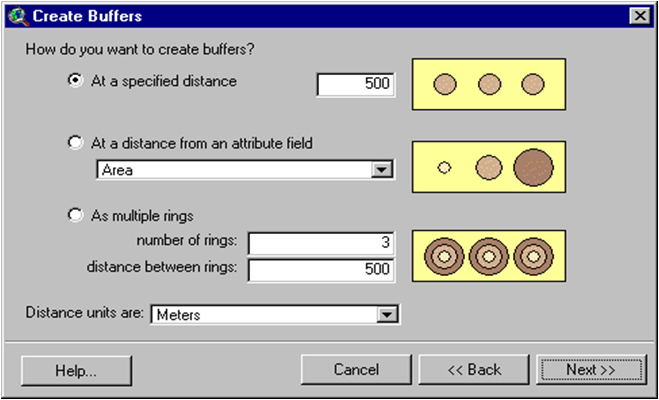
- "at a specified distance": constant zone radius
- "At a distance from an attribute field": radius of the zone according to ONE attribute, which is necessary of numerical type'
- "As multiple rings": concentric zone, but with a constant radius

- buffer zones can be merged into a single polygon or zone for each geographical object
- The area can also be a graph, i.e., it is not linked to any theme, or a theme can be created to contain them
PRACTICAL WORK ARC VIEW SOFTWARE PART 2
 |
| PRACTICAL WORK ARC VIEW SOFTWARE PART 2 |
detailed ArcView
Symbolization of data
- "Single symbol": the same symbol for the whole theme
- "Graduated Color": for the numeric attributes that can be classified. The legend in progressive color according to the importance
- "Unique value": each attribute value has a corresponding symbol
- "Dot: for numerical attributes, the representation is pointing whose density or size depends on the attribute value
- "Chart: for numerical attributes for histogram or pie chart representation.

Double-click on "symbol" and you get:

- (52): to select the screen of a surface and the thickness of the contour
- (53): to choose the type of line, its thickness, the shape of the end of a line and its joining mode with the following one
- (54): to choose the symbol of a point, its size, and orientation
- (55): to choose the font, size, and style
- (56): to choose the color
- "Foreground" for the color of the frames for polygons, the color for lines and points
- "BackGround" for the background color of the polygons
- "OutLine" for the color of polygon contours
- "Text" for text color
- (57): to customize the symbol palette by loading libraries
Text labels
- Menu "Theme" >> "Auto label"

- (58) : Scroll down and choose the name of the attribute you want to use as a label
- (60) : for an automatic location of labels
- (61) : Allow overlap, so all values of the attribute are displayed
- (62) : for attribute values that are repeated several times, only one value is displayed.
- (63) : for the label of linear themes
- (64) : the displayed label changes size with the scale.
- (65) : faster because only the part shown on the screen is labeled
Text labels

- Activate "Text Label".
- Scroll down the list of choices corresponding to "Label Field", and choose the field used as a label
- Choose the place of the text in relation to the entity to be specified
- Menu "Theme" >> "Remove Label" to delete labels
- Before labeling a theme, it is necessary to define the text properties on the symbol palette.
- If this is not displayed then Menu "Window" >> "Show Symbol Window" or CTRL P
- Unwind the tool (28)
- Click on the point to label
Layout and printing
- "View" >>"Layout"

- Choose a model
- to add layout elements pull down the menu
Layout and printing


- (72) : to add a "view
- (73) : to add a default legend
- (74) : to add a graphical scale
- (75) : to add the north indicator arrow
- (76) : to add a diagram
- (77) : to add a table
- (78) : to add a
PRACTICAL WORK ARC VIEW SOFTWARE PART 1
 |
| PRACTICAL WORK ARC VIEW SOFTWARE PART 1 |
GENERAL PRESENTATION ARC VIEW SOFTWARE

ArcView:
-GIS office software created by ESRI (Environmental Systems Research Institute) allowing:- Creation, import, the opening of spatial data_
- Geometric and semantic correction
- Spatial and thematic analyses
- On-screen visualization; layout and printing
- Theme: equivalent to a layer in generic GIS term
- Entity: geometric shape characterized by its geographical position used to model an object.
- Entity types: - Points - Polyline - Polygons
Data sources that can be used in ArcView:
- Shapefile (shapefile : *.SHP)
- ArcInfo Coverage
- DXF file
- DGN file
- IMAGE file (TIF, JPG,...)
Table: Information presented in row and column form
- Line = entity = record
- Column = value of a characteristic or attribute = fields
Shapefile:
- *.shp records geometric entities
- *.shx records the index of geometric entities
- *.dbf Dbase file that saves the information
Project:
text file with extension *.APR which records an ArcView session
Extension:
additional programs to exploit specific GIS functionalities:
- Extension delivered as standard
- The optional extension (sold separately)
YOU MIGHT ALSO LIKE: WHAT IS GIS? / GEOGRAPHIC INFORMATION SYSTEM (GIS)
I - DATA ACQUISITION:
- Use of already existing data e.g.: FTM DB
- Use of data in the form of a table containing GPS coordinates, rectangular coordinates (event table or location table)
- Scanning from a table to be digitized
- On-screen scanning on image background: scanned map, satellite image or orthophoto Note: Using the transform.avx extension to fix the scanned image
- Data import (ex: ArcInfo,MapInfo,DXF,DGN,...)
II - DATA STRUCTURING
- Field creation
- Deleting fields
- Entering and changing values
III - TABLE JOINTS
Join between attribute table and database, join keyIV - ANALYSES
A - SPATIAL :
- Select on a view: - with the mouse- By a polygon
- Selection using spatial relationships (select by theme)
- Proximity analysis (Buffer creation): buffer zone, influence zone (at a constant distance or according to the values in a field)
- Use of geographical processes (Geoprocessing):
- Dissolve
- Merge
- Clip
- Intersect
- Union
- Assign data by location
B - THEMATIC
- Selection using the semantic property of the entities of a theme (use of the query generator)
- Statistics on numerical attributes (statistics)
- Thematic map = how to display a theme
Types:
- Single symbol
- Unique value
- Graduated color
- Graduated symbol
- Chart
ArcView Details
The documents of a project:
(1) : "View": to display the geometry of a theme and manipulate the geometric shapes(2) : "Tables": for handling tabular data and dbf files opened in ArcView
NB: Here the "View" document is active
(3) : "Charts": for the creation of diagrams concerning numerical attributes
(4) : "Layouts": for creating and formatting the layout for printing
(5) : "Scripts": to write programs in "Avenue" language
(2), (3), (4) can be opened either from "project" or in "View

The "View" window

Menus and Toolbars

(7) : Button bar and (8): Toolbar
(9) : Table of contents of the themes
(10) : Status bar
Elements of the toolbar
(11) : to save the ArcView session in a project(12) : to add a theme in a view
(13) : to display the property of ONE active theme
(14) : to change the symbolization of ONE active theme
(15) : to display the attribute table of ONE active theme
(16) : to search for an attribute value containing a set of characters entered via a dialog box
(17) : query builder
(18) : button for managing the map display area
(19) : deselect all

(20) : to query information about an entity clicked on the display window
(21) : pointer
(22) : to display the vertices
(23) : to select geometric entities
(24) : display area management tool
(25) : distance measurement
(26) : HotLink link
(27) : to fit in with the area of interest
(28) : Individual label (attribute display)
(29) : Writing in graphic form
(30) : Creation of geometric shape, in the graphic form if no modifiable theme
the geometric entity in the active theme if it can be modified
(31) : Scale
(32) : Contact details
ArcView Theme
(33) : The theme (Cntry92.shp)(34) : if the box is checked the theme is visible, otherwise, it is not
(35) : the theme is active if its name is raised on the table of contents
NB :
* to be able to work on a theme (change the property, change symbols, etc.), it must be active
* Do not confuse visible theme with active theme

Adding a theme

- menu "View" >> "Add Theme" or click on (12)
- Click on (40) the drive on (39), choose the working directory that appears on (36)
- Choose from (38): "Feature Data Source" for a vector theme"Image Data Source" for a raster theme
- Choose the useful file in (37)
- Click on OK to finish
- For images, TIF files can be opened automatically. These files have a TFW header.
- On the other hand, JPG files require the loading of the "JPEG (JIFF) Image Reader" extension
Property of a view

- It is important to change "Map Units" and "Distance Units":
To be able to enter the scale in (31)
Some operations requiring distance measurements such as buffer zones are impossible.
- To avoid confusion, it is sometimes useful to change the name of the view
- (46) Changing the projection is useful if you have data in geographical coordinates. But when the data are already projected (such as the FTM databases), it is sufficient to change the units to the database unit (meters for BD500, BD100, BD200, BD10).
Symbolization of data
double-click on the name of the theme
Or make the theme active and click on (14)
By scrolling through the menu (50): "Legend type" we have:

PRACTICAL WORK ARC VIEW SOFTWARE PART 2
Subscribe to:
Posts (Atom)


